
Fort Rinella & the Armstrong 100 Ton Gun Introduction
Fort Rinella is also known as The Rinella Battery and all the guards, gunners & demonstaters are all volunteers of Wirtartna - Malta Heritage Trust, who also operate the Noonday Gun at Valletta
- The only purpose of the 100 ton Gun was to provide gun fire onto any ships attempting to attack Valletta or Marsamxett Harbours.
- Fort Rinella was built around the Gun to protect the Gun. As forts go it's defences were limited. and in fact the defences were not classified as a fort. Most of the forts occupants were needed to fire the 100 ton Gun.
- The gun was could fire at a rate of fire of a single shell every six minutes, this was far faster than the 100 ton guns on board the Italian war ships
I assume troops from nearby Fort Ricasoli only 700m away would be used for defence.
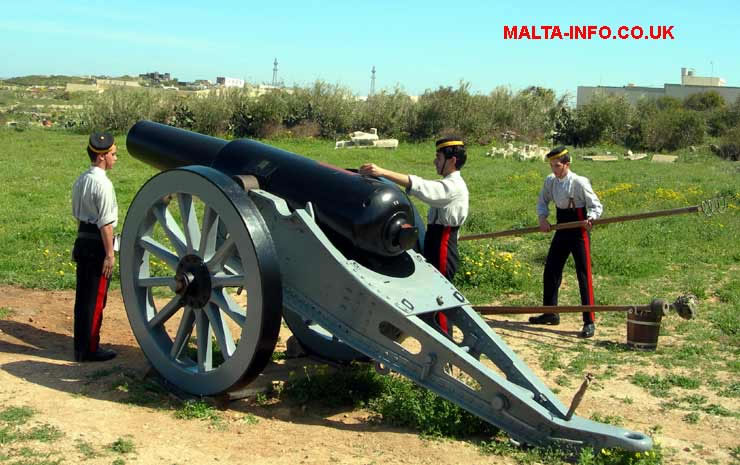
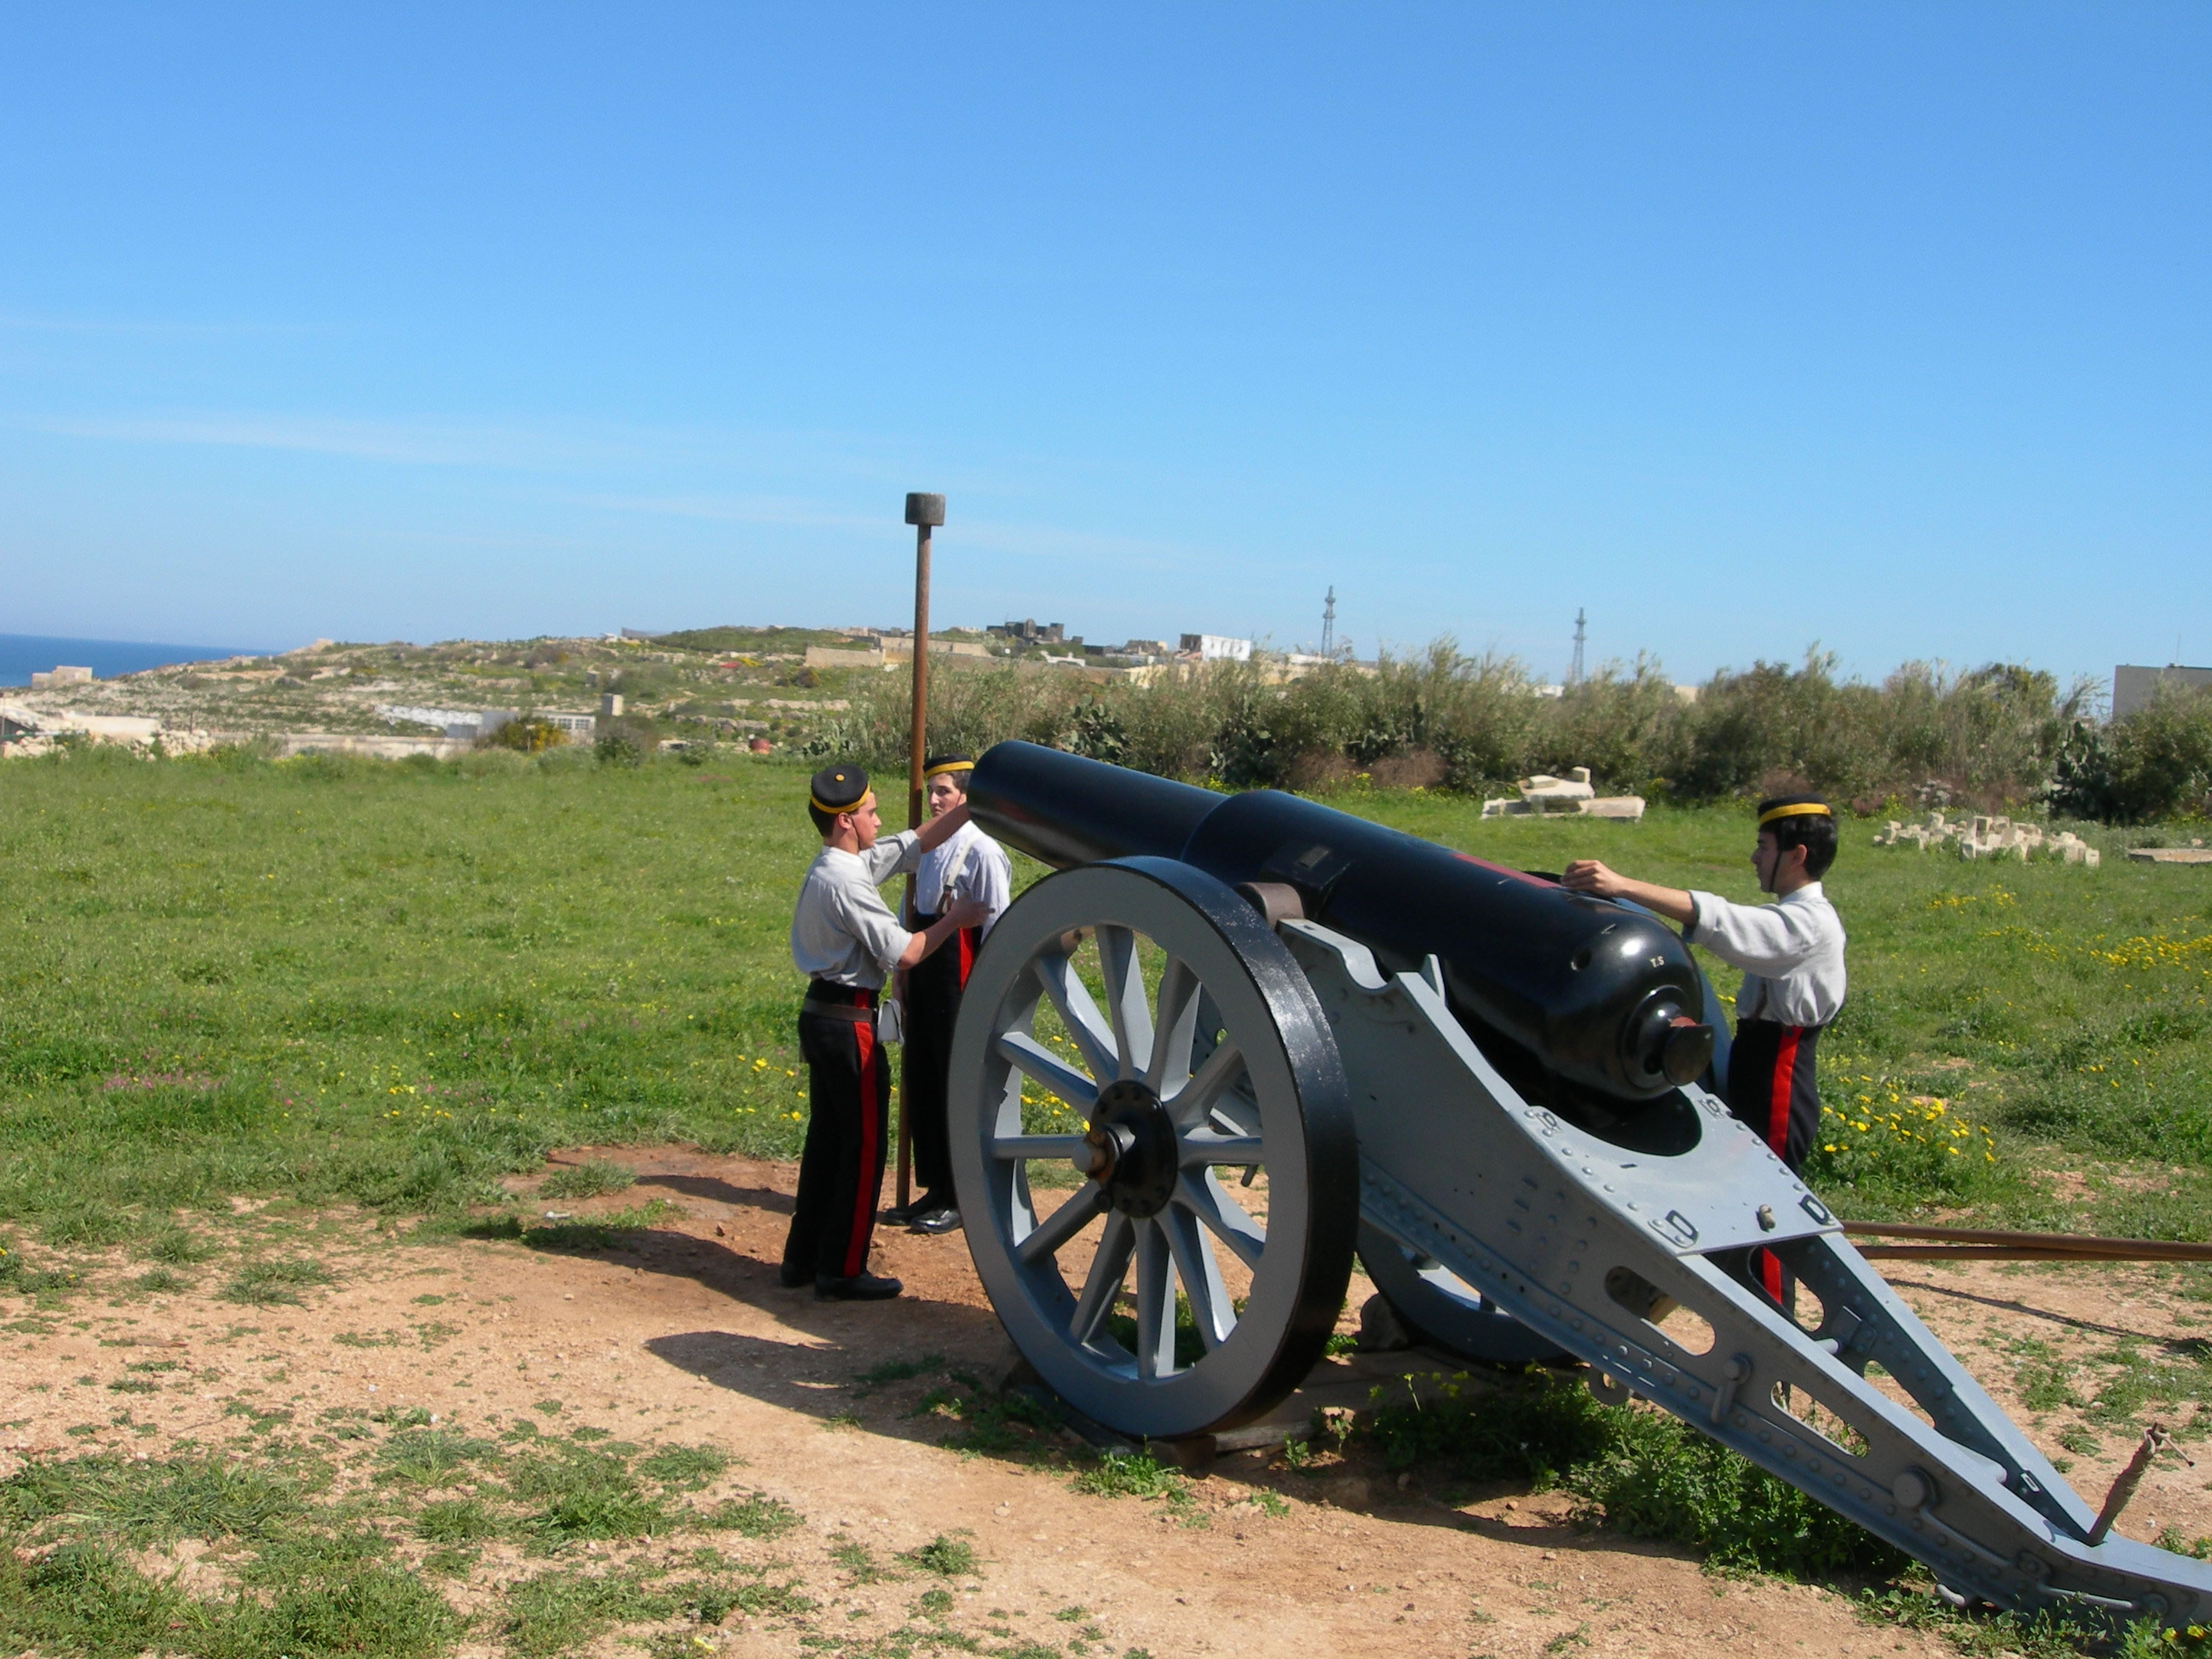
The Hundred Ton Gun
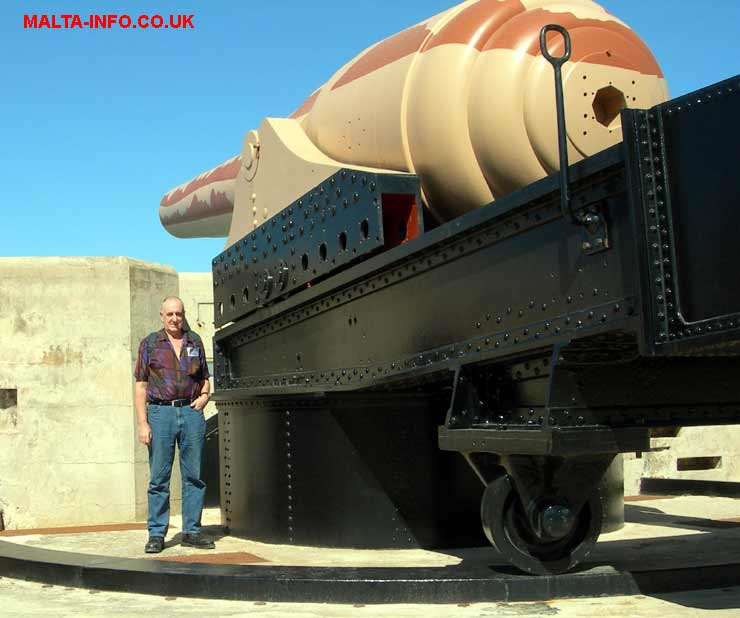
The size of the Gun can be seen by comparing it to the size of a 6foot (1.83m) man
Gun Firing
Click Photo for larger Image
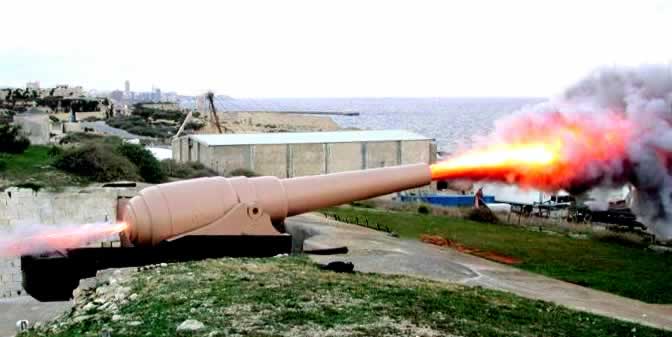
One of the rare occasions when the 100 Ton Gun is fired
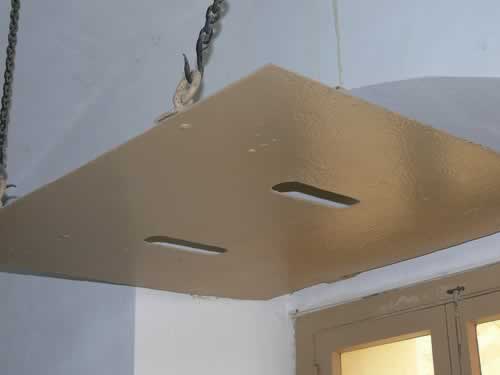
Under Ground Trasportation Casement
Click Photo for larger Image
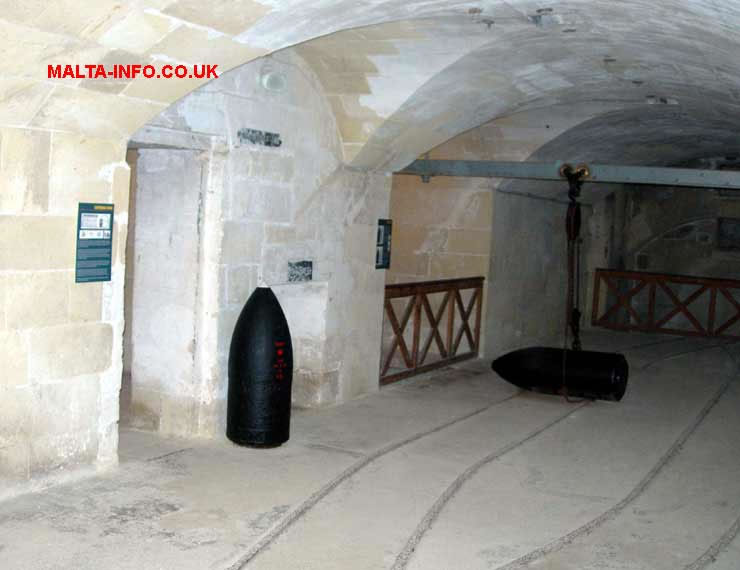
One of two Underground transportation casements
- Underground transportation casement with 2 shells on display and the rail tracks for shell & firing charge transport from Magazines to lift under the loading turret
Shell Magazine
Click Photo for larger Image

The shell are stored within a trench inside the magazine.
The shell are stored within a trench inside the magazine.
Animated Video of the workings of the 100 Ton Gun
An excellent video showing exactly how the gun works.- The layout of the fort.
- Cut away showing the machine room.
- Separate Shell & Gunpowder Magazine Stores.
- Emergency man operated power supply for hydraulic power.
- Hydraulic Accumulator reservoir of water at 940 psi,pounds per square inch of pressure, (65 Bars). For comparison a household water pressure is around 50 psi (3 to 4 bar).
- This hydraulic pressure is used to operate:
- The 2 lifts in the loading turrets
- To revolve the gun left/right by 4 pistons & chains
- To Raise & Lower the barrel by 1 piston.
- To move the barrel forward & backwards on its mounting
- Water Accumulator to wash out the Guns barrel after firing to ensure there are no burning embers that could trigger a premature explosion.
- A wet mop is used for the same purpose on a cannon.
- Removing a metal canister from it's rack & removing 4 charges of Gunpowder, each weighing 112.4 Lbs. (51 Kg) transporting this to the the doorway.
- Loading a 1 Ton Shell onto a carriage on railway tracks. This is followed by the the 4 Gunpowder charges, which are then covered by a metal shroud.
- The Gun revolve & the barrel lowers to the loading turrets automatically opening the armoured door to the turret. to it's loading position
- Lifting the carriage and contents in the loading turrets to the loading position, Ramming the charge & shell into the guns mussel.
- Although this gun is mussel loaded like a cannon it is not a cannon because the mussel is rifled, ie it has spiral grooves in it to spin the shell, achieving greater accuracy.
100 Ton Gun Loading Diagram
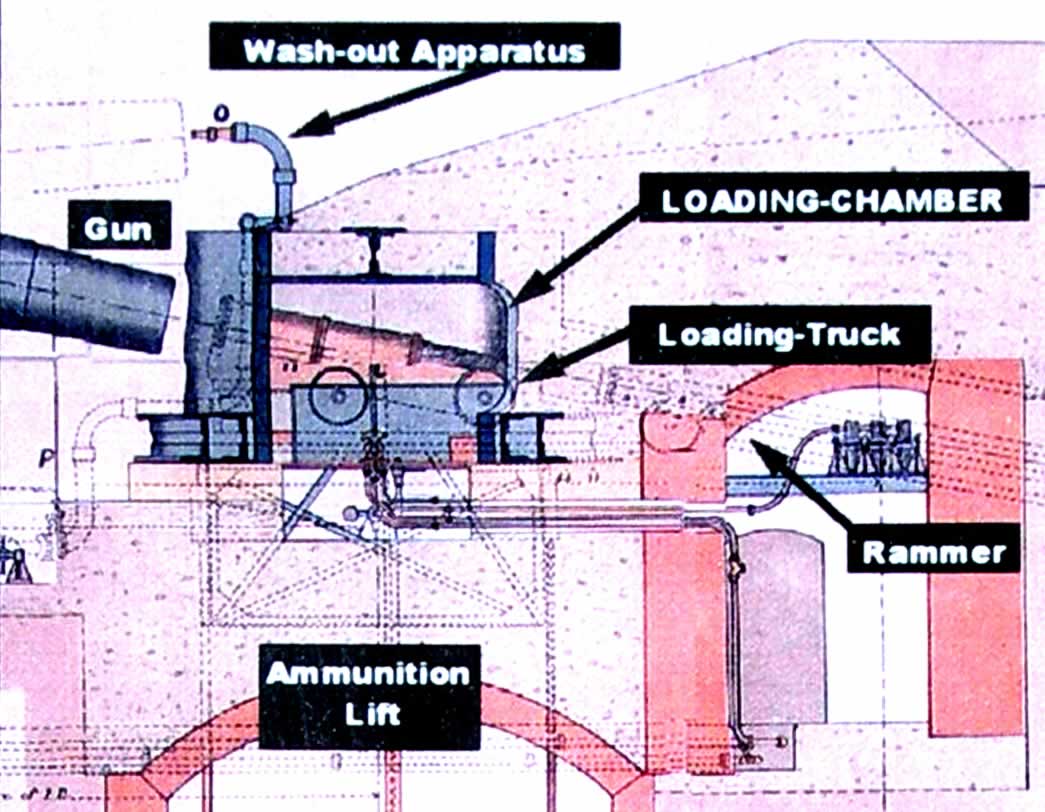
Showing Gun, Wash out apparatus, Loading Chamber / Turret, loading truck, lift & rammer
The Wash out apparatus, does the same job as a wet mop in a smaller cannon to extinguish any remaining burning embers that could premeturly ignite the nextexplosive charge.
- The massive size of the 100 ton gun at Rinella Fort can be gauged by the over 6 foot tall man stood next to it.
- The guns were built by Armstrong's of Newcastle on Tyne UK and were the largest guns at the time.. The British were not interested in buying them until Italy purchased 8 of them and placed 4 onto 2 battleships the Duilio and the Dandalo.
- This made the British navy panic and they rapidly placed 2 guns at Gibraltar & 2 on Malta. The land based guns could be loaded far faster than ship loaded guns by doubling the loading turrets, one turret on each side of the gun.
- The guns were loaded the same way as a cannon via the muzzle
- In order to increase the firing rate to 1, one ton shell ever 6 minutes. the loading system was duplicated, ie 2 systems were installed, one on eithere side of the 100 Ton Gun.
- The side were used alternatively and consised of:
- Armoured Loading Turrets
- Lifts inside the turrets
- Rammers
- Transport Casements with a transport carriage on rail tracks.
- Shell Chambers
- Seperate Gun Powder firing charge Chambers
- The Gun movements, lifts and rammer were operated by hydraulic power provided by a steam engine.
- A manual backup system was provided for the hydraulic power.
The 100 ton gun was fired twice a year for practice, and never fired in anger.
The gun was almost obsolete by the battery completion in 1886, and officially declared obsolete in 1906
This was due to rapid development in armaments:
- Cordite was invented in the early 1800's, a superior propellant for guns
- Cordite burnt at a slower speed than black powder (gunpowder).
- Cordite required longer barrels on the guns, and that required breach loading
- By 1886 breach loading guns started to appear on the weapons market.
- By 1890 muzzle loading guns ceased to be made
- This does not reduce the amazing and impressive size of the 100 ton gun
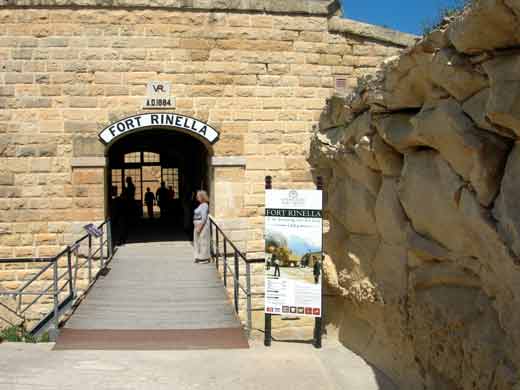
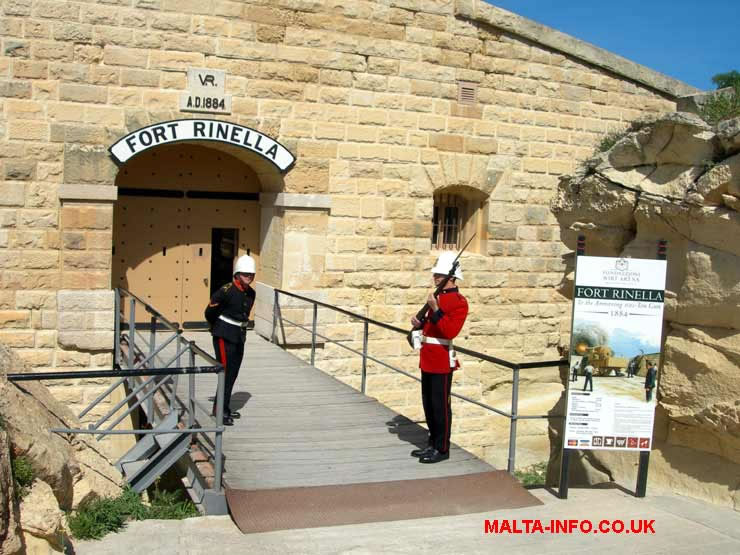
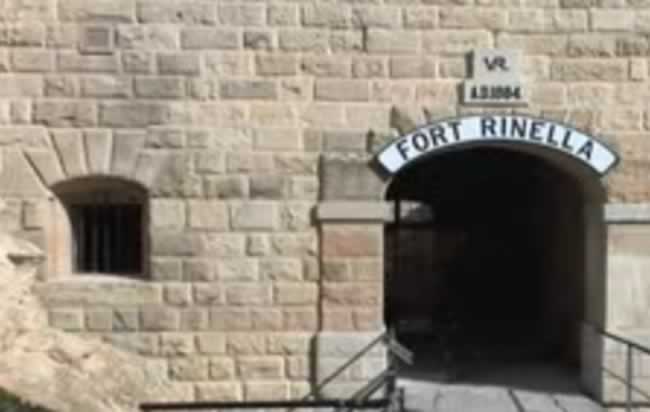
The entrance to Fort Rinella, Malta
Introduction
As fortifications on Malta go, Fort Rinella is a baby, being built between 1878 and 1886 by the British during the reign of Queen Victoria. Besides the name Fort Rinella it is also called the Rinella battery, because it was built around and to protect a monstrous 100 ton gun, the largest gun made at that time.
The fort was home to 30 gunners.
British manufactured by William George Armstrong of Newcastle upon Tyne. Besides manufacturing the worlds finest armaments Armstrong also built the famous Newcastle Swing Bridge.
Although there are informative signs around the fort giving information about the area you are in, I highly recommend that you join one of the 45 minute conducted tours of the fort.
The gun actually weighed 156 tons, and had a rifled barrel just over 17 inches (45 cm) internal diameter. Because it was rifled the gun fired a shell, not a cannon ball weighing 1 ton. The range of the gun was 8 miles and the shell could penetrate 21 inches of armour.
Fort Rinella Conducted Tours
These tours are conducted by a group of volunteers from Malta Heritage Trust dressed in period soldiers uniforms. Not only do they give very informative talks about the workings and life of the fort but they perform various drills and demonstrations, some of which I have tried to capture in the photographs and descriptions below. Well worth the extra charge. They take place twice a day
Firing a large Victorian Cannon demonstration
After paying for entrance around Lm3 for adults and paying an extra LM2 for the tour you are take to a field near the entrance to the site to see a large cannon being fired
Preparing Victorian Cannon. Fig 1.
Required Tools & accessories
- 3 long pole tools
- With a screw worm end
- With a mop end In some cases a mop at either end. One wet & one dry
- With a solid end to ram home the black powder charge, then the cannon ball, shot container or other projectile
- Water bucket to wet the wet mop
- Black Powder Charge in a fine cloth Bag
- Pin that is pushed through the touch hole to make a hole in the black powder charge bag for the insertion of a fuse. Not shown
- Fuse similar to a stiff piece of cotton string that is impregnated with black powder. Not shown
- Projectile. Not used in the demonstration.
Preparing the canon for firing
Your tour guide dressed in period army uniform explains what the gun crew are doing to prepare and fire the cannon.
The gun crew check the cannon to make sure that the cannon has not already been loaded. This is done by running the pole held by the gunner on the right,
down the barrel. The screw end can be used for removing wadding or the black powder charge. Left photograph above
- The black powder charge usually called gunpowder by the general public, contained in a fine cloth material is loaded into the cannon and pushed down with the rammer pole which can be seen in the right photograph above. The cannon ball is then inserted and rammed
home. A stiff pencil like fuse is pushed into the hole at the top rear end of the cannon, this stiff wick pierces the muslin bag containing the powder.
- A slow slow burning match on the end of a stick is used to light the fuse. In the photo on the right a tourist has just lit the fuse and is retreating as the cannon fires
- A wet mop is then pushed down the barrel to ensure that there are no burning embers that could ignite the following charge
Fort Rinella's Entrance & Ditch Protection
The entrance to the fort is protected by several methods:
- Bent Road Design
- Drawbridge
- Sentry
- Guards and Gate gun loopholes
- Ditch, Counter-scarp gallery & Caponiers
- Loopholes from the Guardroom and Barracks
Bent Road Design & Parapet with Musket Loopholes
The design of the road and it's bend to the entrance is such that the Fort entrance gate is hidden from view by the sinking the road & building the grass bank, thus protecting the entrance gate at the fort rear from long distance canon fire.
Because the road sweeps round the inland of the fort it can be raked by canon fire from the ramparts, and also by musket fire from the loopholes through the rampart parapet..
The Drawbridge & Fort Rinella Entry Gate
Click Photo for larger Image
Fort Rinella Entrance Gate, Lance corpral, Sentry & Guardroom Window
- The Rinella Fort entrance was guarded by a sentry and protected by a:
- Drawbridge. The original Guthrie draw bridge was not raised but pulled inside of the fort, through the gate on rollers. The present bridge is fixed in position.
- Fire loopholes in the Gate, Guardroom window & 2 windows in Barrack rooms.
Gate Sentry
Click Photo for larger Image
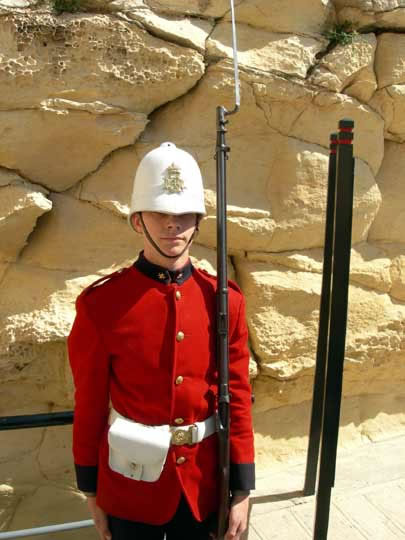
Gate Sentry.
- The actual Gate Sentries post was 13m from the gate. This allowed him to not only see the gate but also along the bent approach road.
Entrance Gate, Guards and Gate gun loopholes
Click Photo for larger Image
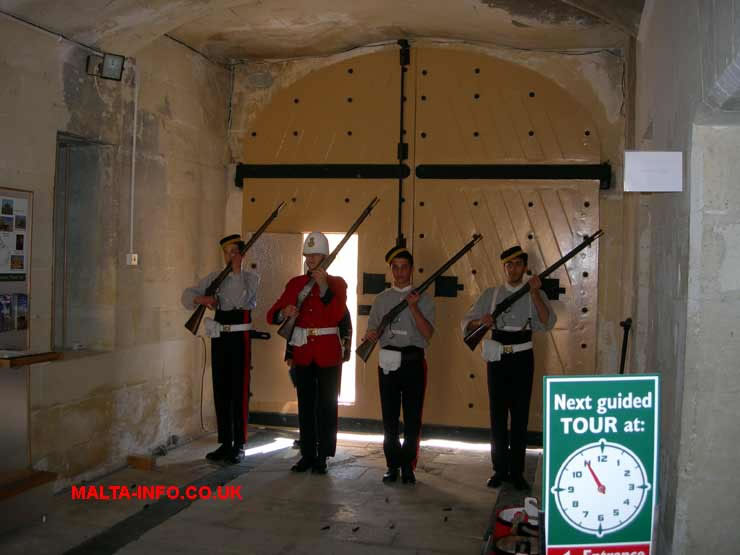
Guard Demonstration inside the Gate
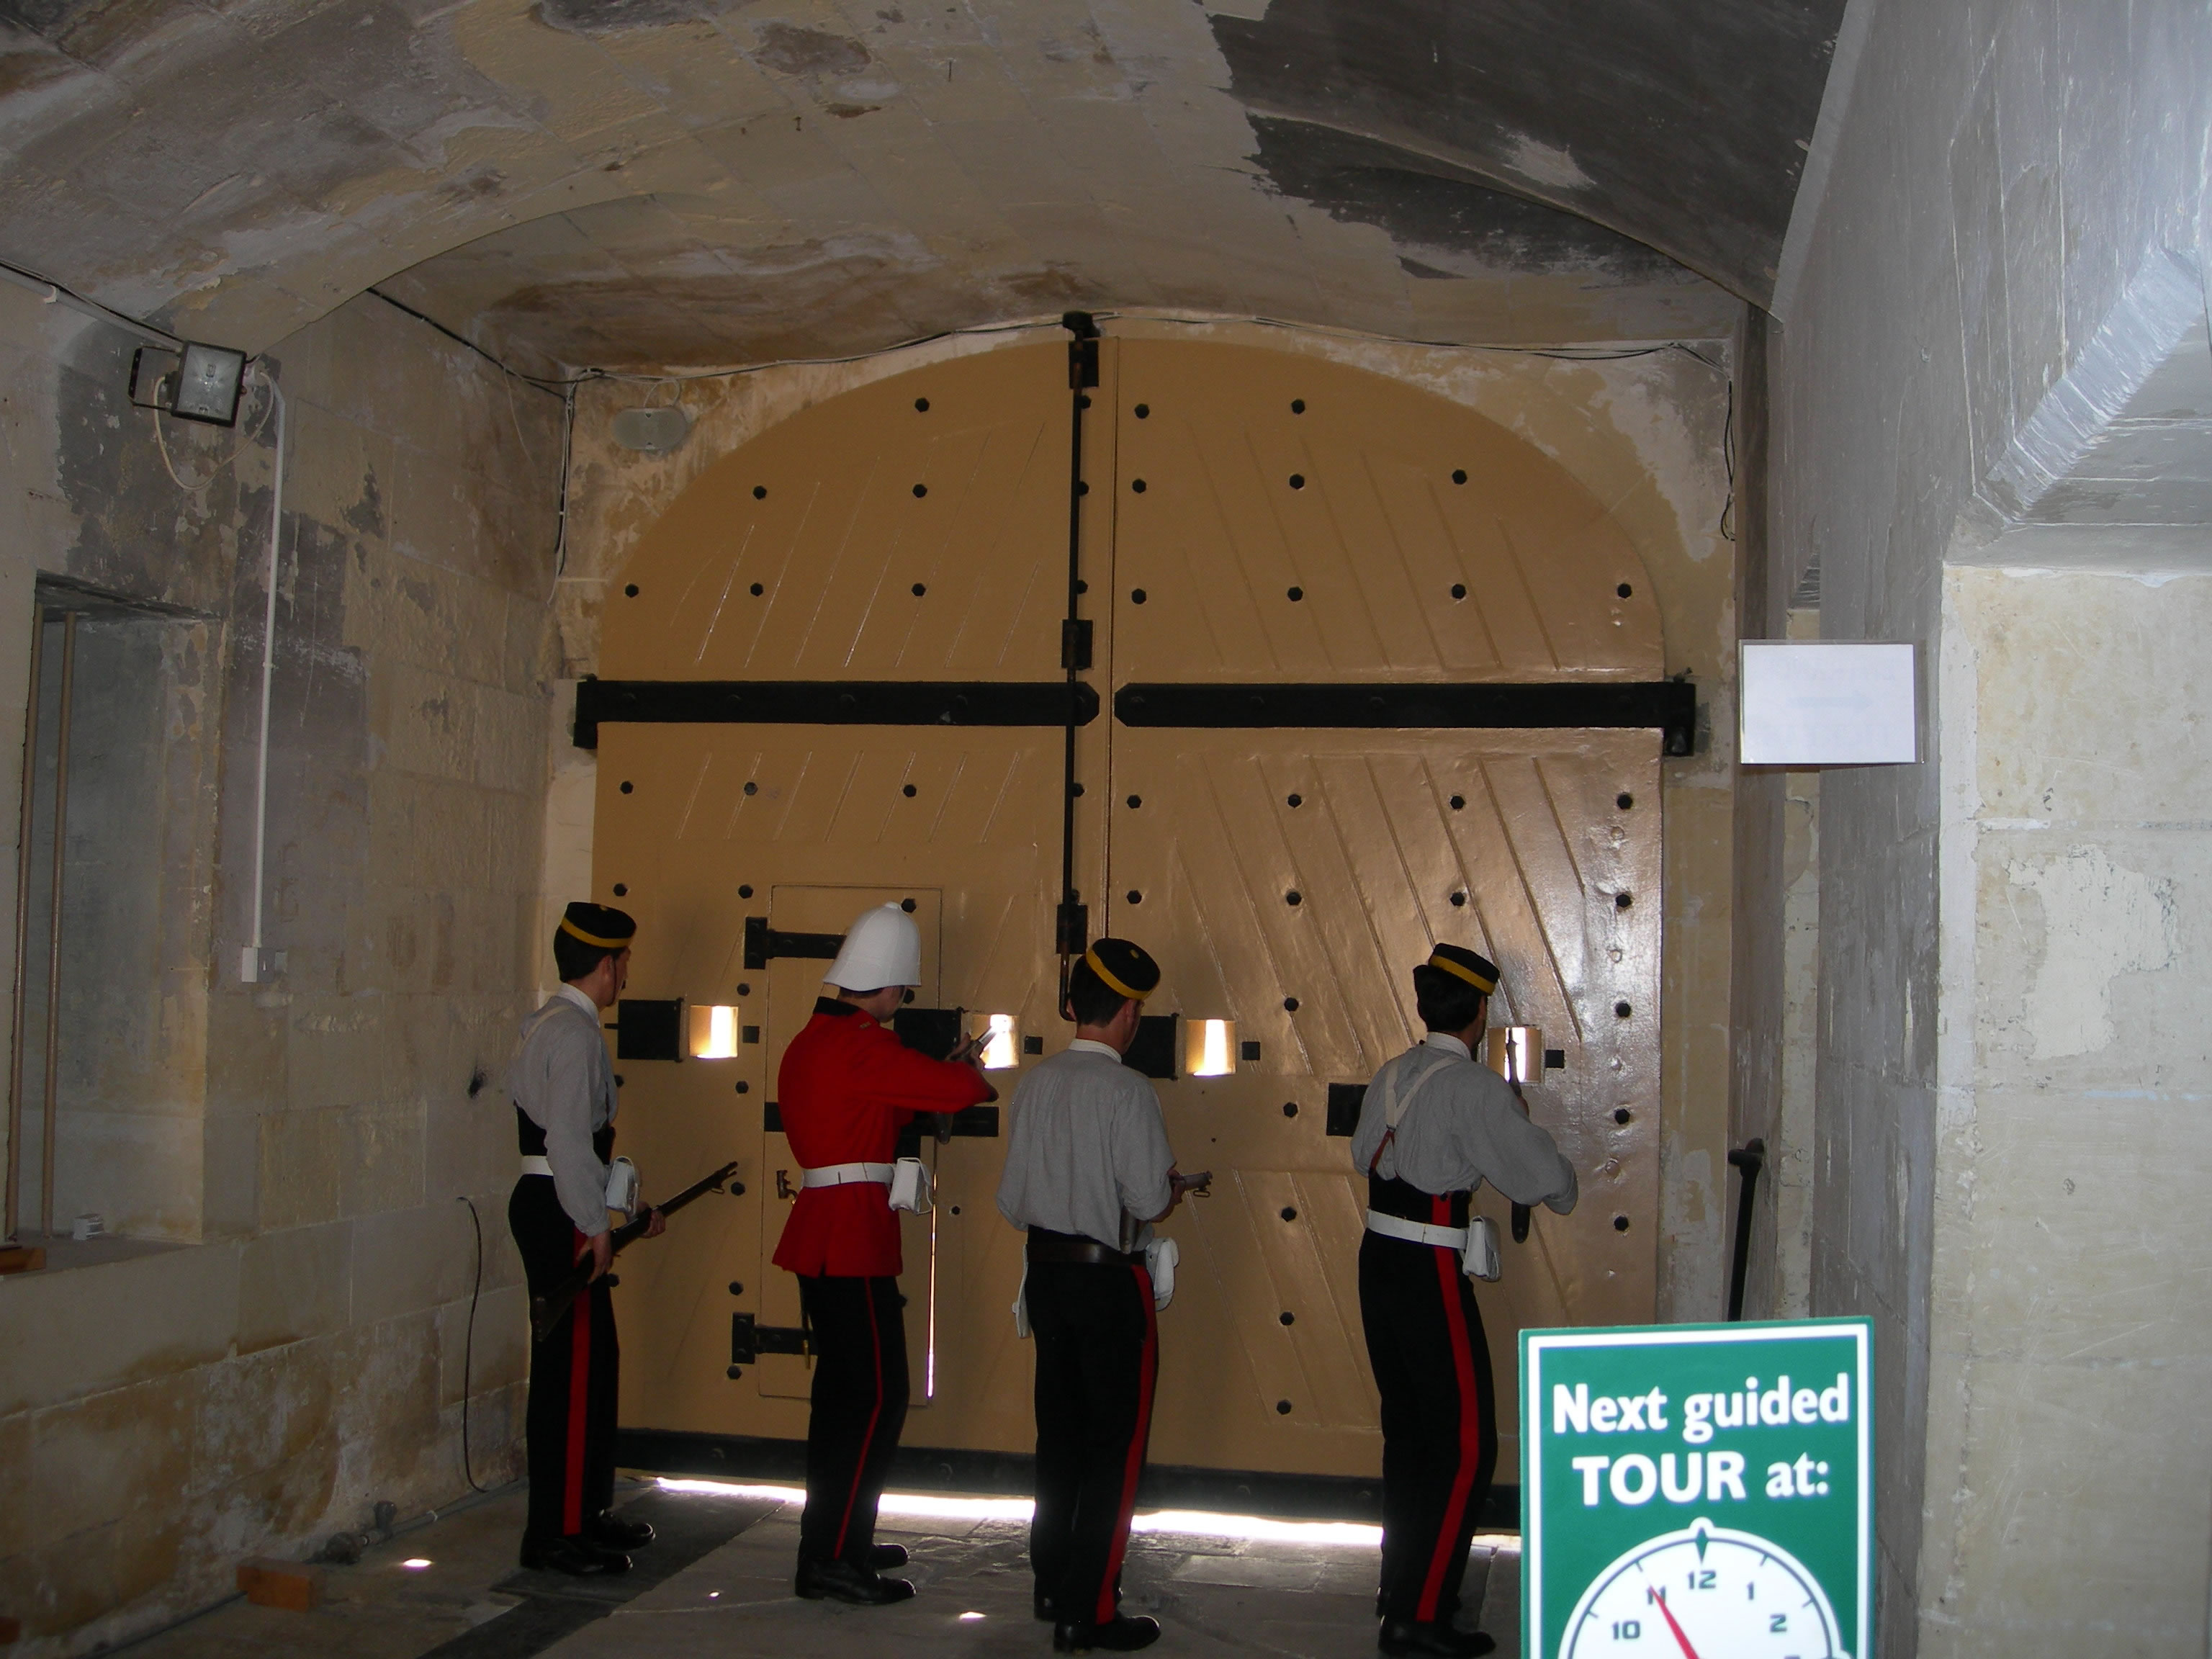
Firing through the Gate Loopholes Demonstration
- The thick wood of the gate was reinforced with iron plate making it bullet proof.
- The gate also had closable loopholes through which the guards could fire at attackers
Guardroom & Barracks and there Loopholes
Guardroom
Click Photo for larger Image
Musket ball proof metal plate can be dropped over the window
Rinella Gate, Sentry & Guardroom Window
- The Guardroom is located just inside the gate on the left, and this room had a windows with a metal plate is musket ball proof metal plate could be lowered over the window, if the fort was attacked.
- The plate had 2 musket loopholes so that fire could be directed:
- Into the far side of ditch especially at anybody trying to descend into the ditch
- The bottom end of the approach road
Barrack Room Windows & Loopholes
Click Photo for larger Image
Fort Rinella Gate & 1 of the barrack room windows
Barrack room windows at 2 different heights
Barracks
- Opposite the guardroom are the barracks with a row of windows similar to the one in the guardroom with protective metal plates providing similar fire power.
- The 2 windows nearest the gate are located at a slightly higher level than the rest, to fire on the entrance approach.
- The lower ones can fire directly into the ditch or at any enemy attempting to decend into the ditch
- The approach to the ditch is covered by fire from the parapet on the roof
Cookhouse
- Further down the entrance passage on the left is the cookhouse.
Central Sunken Passageway
- At the other end of the entrance passage way at right angles is a wide passageway recessed into the ground but without a roof. This is where the Bayonet Drill Demonstration took place.
- Off this passage way are:
- The entrances to the underground magazines,steam engine, hydraulic equipment etc.
- Ramp up to the 100 Ton Gun
- Steps up to the rampart musket positions
- Entrance to the tunnel to the Counter-scarp gallery
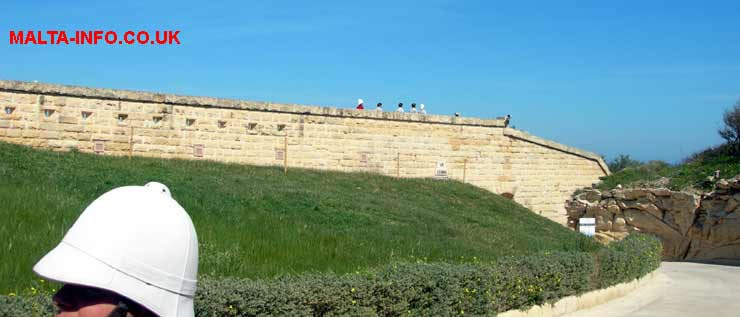
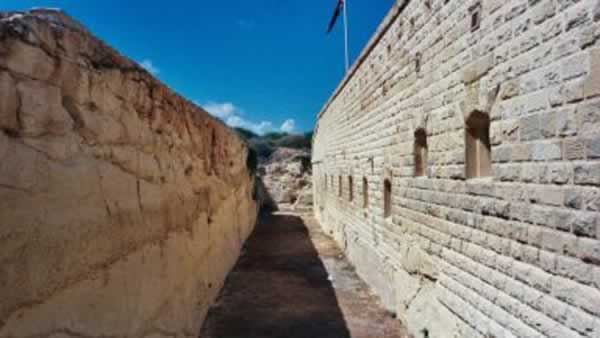
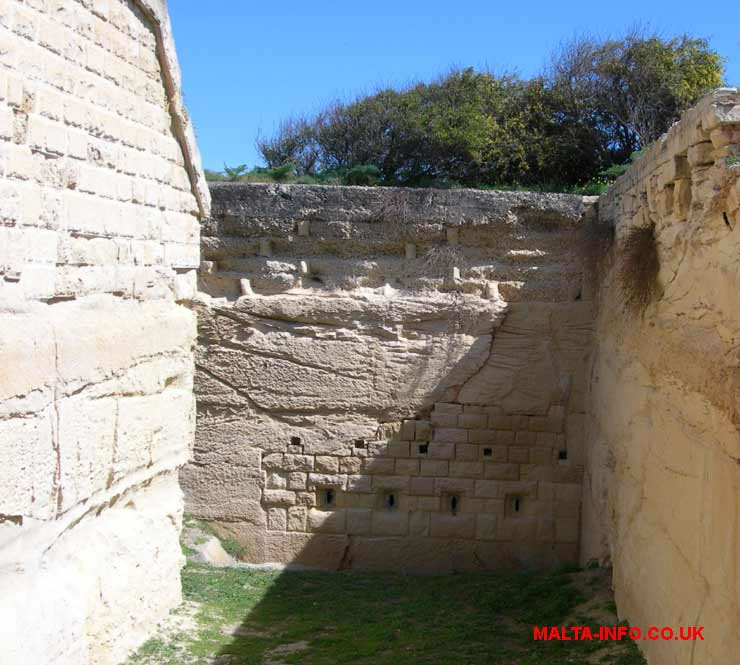
Ditch, Counter-scarp gallery & Caponiers
The dry ditch completely surrounds the fort and was defended by:
Counter-scarp gallery
Click Photo for larger Image
Counter-scarp gallery with 4 loopholes
- One Counter-scarp gallery shown in the photograph above protects the entrance ditch. This gallery let defenders fire directly along the ditch, through the 4 musket loopholes seen in the central lower portion of the photograph, the 4 small square black holes
- The Counter-scarp is the outside wall of the ditch, the defenders reach the gallery from the fort by a tunnel under the ditch
- Besides the 4 Loopholes, there are 5 even smaller holes at a higher level to allow the escape of smoke from the defenders musket fire.
Caponiers
- Three Caponiers which have a similar duty to the Counter-scarp gallery but are built out into the ditch from the fort.
- The Caponiers are located to protect the ditch
- At the front ( seaward side) is a Full Caponiers, which has loopholes on 2 sides to fire along the ditch from its central position.
- At the sides of the fort Half Caponiers which has loopholes on 1 side only, to fire along the side ditch.
Bayonet Drill Demonstration at Fort Rinella
Click Photo for larger Image
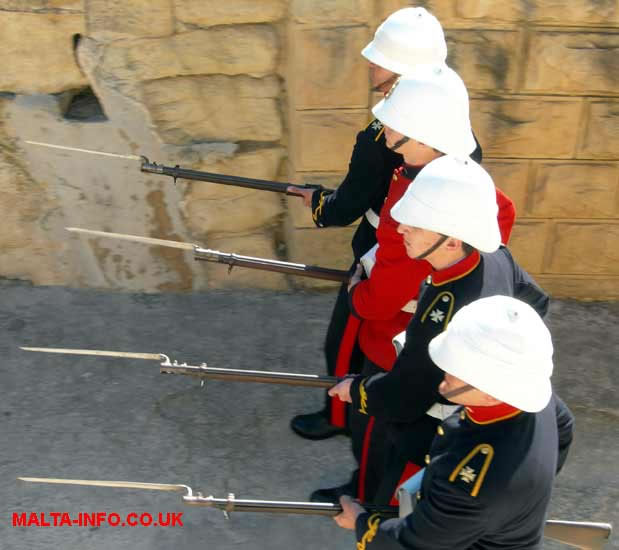
Bayonet Drill Demonstration
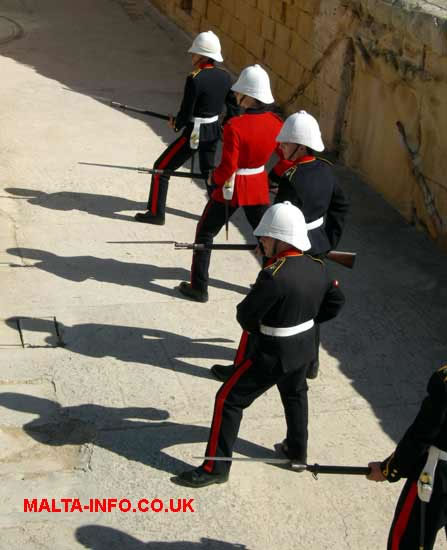
Bayonet Drill Demonstration
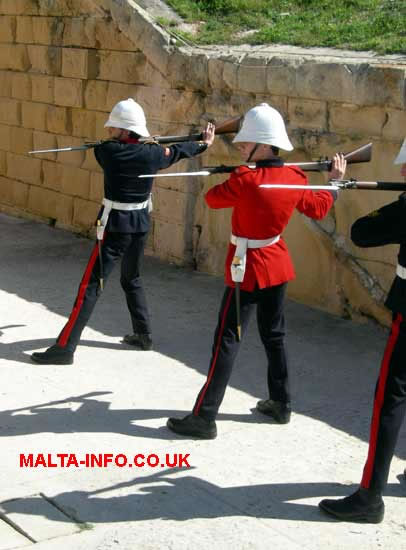
Bayonet Drill Demonstration. High attack position
- A demonstration of bayonet drill was provided showing different methods of holding the weapon for both low and high attacks. These were demonstrated in the central sunken passageway
Signalling Demonstration at Fort Rinella
Click Photo for larger Image
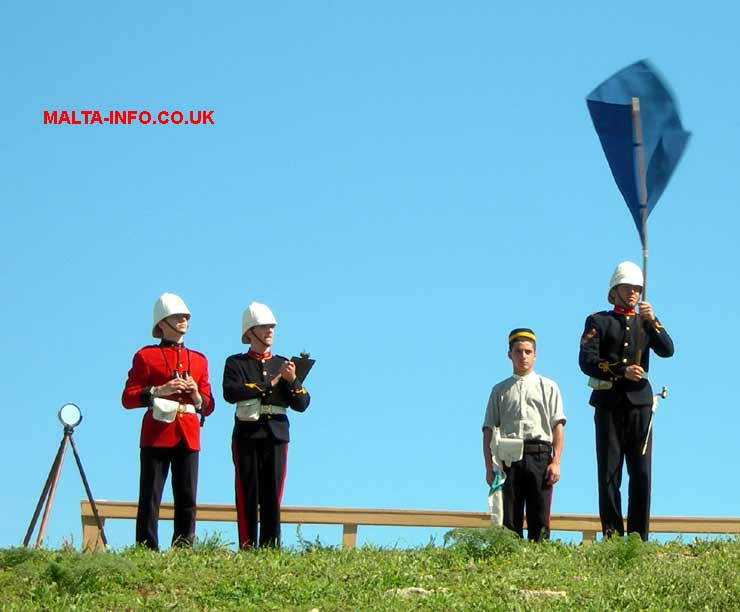
Using a large object
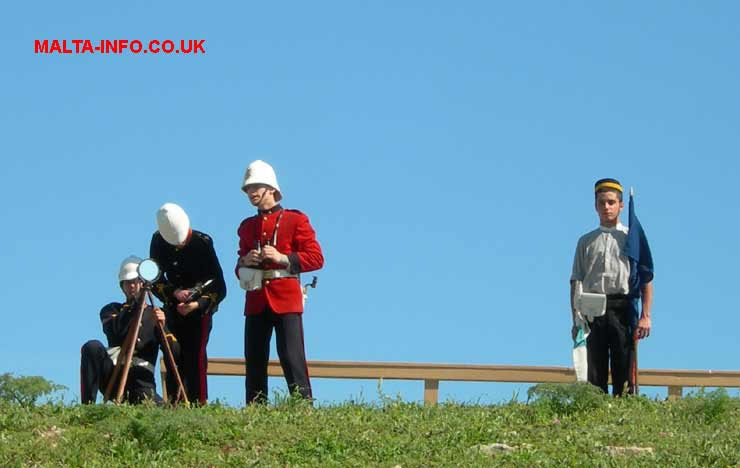
Heliograph using a mirror
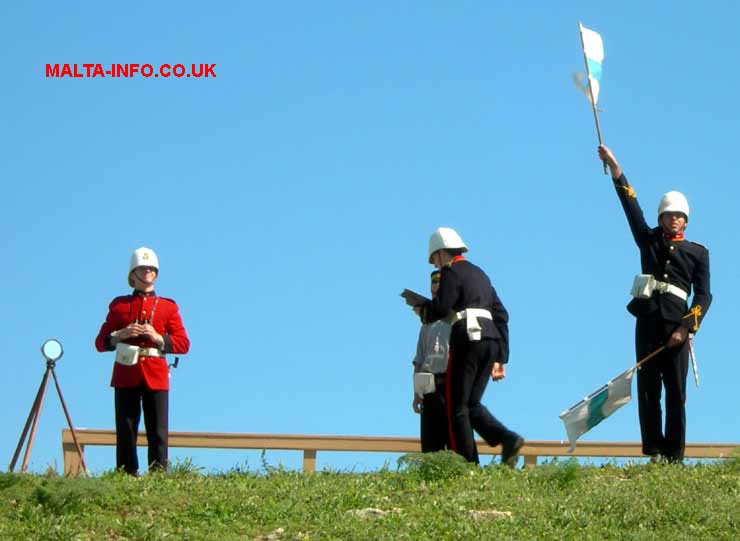
Semaphore flags, displaying K or 0 (zero) in photo
The signalling methods were all visual and used, mirrors ie heliographs to reflect the sun, semaphore flags and a larger visual object method.
Transport
Bus Route 3 Valletta - Kalkara, approx. every 30 minutesFree Bus
This service is provided once a day between Monday and Saturday departing as follows:
- 12.20hrs from the Saluting Battery
- 12.45hrs from the Malta at War Museum
One way only return on the route 3 bus from outside the Rinella Fort gate